
Office Chair and Conference Chair Installation
The installation of office chairs and conference chairs should be carried out step by step according to the specific type. Here is a detailed installation guide:
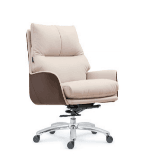
Conference Chair Installation Steps
Component Inspection
First, check the component list to ensure it includes the lower frame, backrest, seat, 4 clips, armrests, screws, and a wrench. If you have purchased casters or a writing board, also check that these components are complete.Clip Installation
Select 2 clips of a specific shape from the 4 clips and install them into the screw holes near the center of the seat. Use a wrench and screws to initially fix them, ensuring the clips fit snugly against the seat.Seat and Frame Connection
Align the seat with the screw holes on the chair frame. Insert the screws but do not fully tighten them. Adjust the horizontal position of the seat and then tighten the screws one by one to avoid misalignment.Backrest Installation
Align the backrest with the shorter end of the lower frame. Press evenly on both sides of the backrest with both hands to fully insert it into the lower frame. Align the screw holes and tighten the screws. If there is a gap between the backrest and the lower frame, readjust the pressing position.Writing Board Installation (Optional)
If the chair is equipped with a writing board, fix it to the side of the armrest or seat according to the instructions. Usually, it is connected using screws or clips. After installation, check that the writing board is stable.
Office Chair Installation Steps (General Type)
Caster and Five-Star Base Assembly
Insert the 5 casters vertically into the slots of the five-star base, ensuring they are fully inserted and rotate freely. If the casters are difficult to install, slightly rotate them to adjust the angle[4]^.Gas Lift and Seat Pan Installation
Insert the gas lift into the center hole of the five-star base, and then align the seat pan with the top of the gas lift and insert it. Use 4 short screws to fix the seat pan to the bottom of the seat. Tighten the screws in a cross pattern to maintain balance[4]^.Backrest Rod Installation
Insert the backrest rod with the groove facing up into the designated hole on the seat pan and fix it with medium-sized screws. Pay attention to the direction of the backrest rod during installation to avoid an unstable structure with the groove facing down.Overall Assembly
Insert the combination of the gas lift and the backrest rod into the hole on the seat pan and tighten the nut to fix it. If the chair is equipped with a footrest rod, insert it into the footrest frame and use 2 small screws to block the small holes at the end to prevent loosening.Armrest and Power Connection
Install the left and right armrests using long screws, ensuring they are aligned with the seat. If it is a 9-point massage model, insert the power massage wire into the designated interface and test whether the massage function works properly.
Precautions: It is recommended to read the instructions before installation. Avoid using excessive force when using tools to prevent damage to the components. If the screw holes do not align, check whether the previous steps have been installed correctly.


